일주일동안 날 괴롭혔던..
OpenSSL에 대해 정리하려고 한다.
정보가 잘 없다고 해야하나.. 난 진짜 SW에 대해 잘 모르는데.. ㅠ_ㅠ
다른 블로그들 보기 너무 어려워서 내가 엄청 잘 정리해봐야지 하며 정리하는 글!
1. 필요한 파일 다운로드
1) ActivePerl 설치
www.perl.org/get.htmlwww.activestate.com/products/perl/
ActivePerl: the Enterprise-grade Perl from ActiveState
Perl from ActiveState is the world's most trusted Perl distribution. Support your mission-critical applications with ActivePerl.
www.activestate.com
2) nasm 다운로드
3) OpenSSL 다운로드
/source/index.html
The master sources are maintained in our git repository, which is accessible over the network and cloned on GitHub, at https://github.com/openssl/openssl. Bugs and pull patches (issues and pull requests) should be filed on the GitHub repo. Please familiari
www.openssl.org
/source/index.html
The master sources are maintained in our git repository, which is accessible over the network and cloned on GitHub, at https://github.com/openssl/openssl. Bugs and pull patches (issues and pull requests) should be filed on the GitHub repo. Please familiari
www.openssl.org
사이트에서 자신이 원하는 버전의 OpenSSL을 받는다.
나는 최신 버전으로 하기 어려워서..? 내가 참고한 블로그, 유튜브 영상에 있던 버전인 1.0.2로 진행했다.
예전 버전의 OpenSSL은 아래 사이트에서 받으면 된다!
/source/old/index.html
Old Releases Here are the old releases. Legalities Please remember that export/import and/or use of strong cryptography software, providing cryptography hooks, or even just communicating technical details about cryptography software is illegal in some part
www.openssl.org
자신이 원하는 버전의 OpenSSL을 받아 저장 후 압축을 풀어준다.
나의 경로는 E:\openssl-1.0.2h\openssl-1.0.2h 이다.
2. 빌드
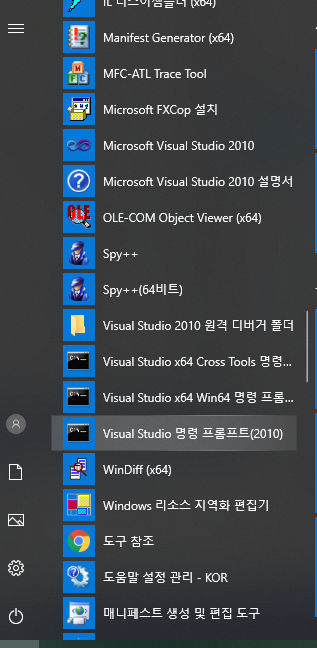
1) Visual Studio 명령 창 실행
시작의 모든 프로그램을 볼 수 있는 창에서 Microsoft Visual Studio 2010 선택

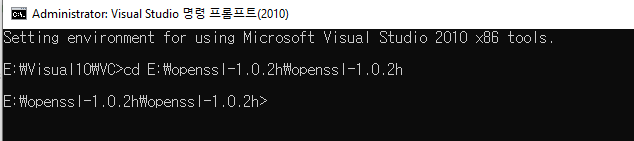
2) OpenSSL이 있는 경로로 이동
$cd 경로 (cd E:\openssl-1.0.2h\openssl-1.0.2h)
3) Configure 명령어 실행
$perl Congfigure 빌드 버전 옵션 --prefix=설치 경로
예시 : $perl Configure VC-WIN32 no-idea no-md2 no-mdc2 no-rc5 no-rc4 no-asm --prefix=E:\OpenSSL_output
* 64bit 로 빌드할 경우는 VC-WIN32 대신 VC-WIN64A 를 사용
* 저작권 문제 발생하지 않게하는 옵션 : no-idea no-md2 no-mdc2 no-rc5 no-rc4

4) Makefile을 만들기
$ms\do_ms.bat
* 64bit 로 빌드할 경우는 ms\ do_win64a 를 실행

5)nmake로 빌드 시작
이때 나는 바로 nmake 명령어를 실행하면 u1077 에러가 계속 나서 구글링을 엄~청해서 해결법을 찾았다.
내가 찾은 해결법은
- ms\ntdll.mak 파일 수정


위의 사진에서 표시된 부분을 아래 사진과 같이 수정하면 된다.

- openssl/crypto/x509v3 의 v3_pci.c와 v3_pcia.c 파일 수정

두 개의 파일을 Visual Studio로 실행
위에 있던 주석을 전부 지워준 후에 파일 > 고급 저장 옵션 > 유니코드(서명 있는 UTF-8) - 코드 페이지 65001 > 확인


이제 드디어 nmake 준비 완료!
$nmake -f ms\ntdll.mak
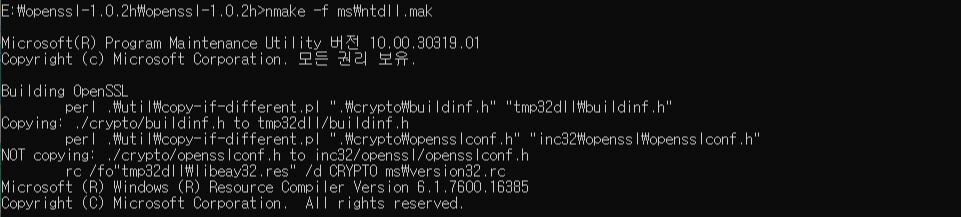
조금 기다리다 보면 빌드가 완료되고
openssl 폴더의 out32dll 폴더에 가면 dll, lib 파일이 생성되어있다.
여기서 생성된 lib 와 dll 을 import 해서 사용하면 제대로 된 암호화 실행이 가능하다.
끄읐!
'WORK > Window' 카테고리의 다른 글
| [Java] 개발 환경 설치 (JDK 설치, 환경변수 설정, 이클립스 설치) (0) | 2020.09.28 |
|---|