728x90
반응형
Google Cloud Speech 연동하는 방법은 https://m.blog.naver.com/korca02220/221724072642 블로그 참조
단어 단위로 끊어서 추출
from google.cloud import speech
import io

def transcribe_audio_with_word_time_offsets(audio_file_path):
    # Initialize the Google Cloud client
    client = speech.SpeechClient()

    # Load the audio file
    with io.open(audio_file_path, "rb") as audio_file:
        content = audio_file.read()

    # Configure the audio and recognition settings
    audio = speech.RecognitionAudio(content=content)
    config = speech.RecognitionConfig(
        encoding=speech.RecognitionConfig.AudioEncoding.LINEAR16,
        sample_rate_hertz=16000,
        language_code="en-US",
        enable_word_time_offsets=True  # Enable word time offsets
    )

    # Perform the transcription
    response = client.recognize(config=config, audio=audio)

    # Process the response
    for result in response.results:
        print(f"Transcript: {result.alternatives[0].transcript}")
        for word_info in result.alternatives[0].words:
            word = word_info.word
            start_time = word_info.start_time.total_seconds()
            end_time = word_info.end_time.total_seconds()
            print(f"Word: {word}, Start time: {start_time}s, End time: {end_time}s")

if __name__ == "__main__":
    audio_file_path = "./audio.wav"
    transcribe_audio_with_word_time_offsets(audio_file_path)
에러 수정
1. 싱글 채널 오디오 파일로 변경
이렇게 소스코드 생성 후 실행했을 때, 에러 발생!
google.api_core.exceptions.InvalidArgument: 400 Must use single channel (mono) audio, but WAV header indicates 2 channels.
이유는 구글 클라우드 API는 싱글 채널 오디오(mono)만 지원 가능한데, 이 오디오 파일은 2 채널 오디오(stereo) 파일이라 안되었던 것!
그러면 이제 싱글 채널 오디오로 변경해주면 된다
ffmpeg -i path/to/your/audio.wav -ac 1 path/to/your/audio_mono.wav
2. rate hertz 파일에 맞도록 수정
google.api_core.exceptions.InvalidArgument: 400 sample_rate_hertz (16000) in RecognitionConfig must either be omitted or match the value in the WAV header (48000).
샘플링 레이트를 알 수 있는 방법은
ffmpeg -i path/to/your/audio.wav
을 해보면 오디오 파일에 대한 정보가 나온다.

아래서 두 번째 줄을 보면 48000 Hz로 스트림 정보를 알 수 있다.
위 정보에 맞게 소스코드에서 sample_rate_hertz 을 수정해주면 된다.
    # Configure the audio and recognition settings
    audio = speech.RecognitionAudio(content=content)
    config = speech.RecognitionConfig(
        encoding=speech.RecognitionConfig.AudioEncoding.LINEAR16,
        sample_rate_hertz=48000,
        language_code="en-US",
        enable_word_time_offsets=True  # Enable word time offsets
    )
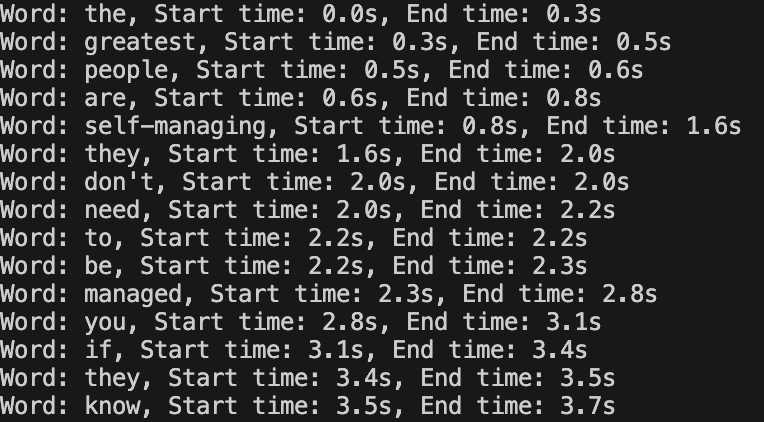
이제 파이썬을 실행해주면

이렇게 단어 단위로 시작/끝 시간을 알 수 있다.
문장 단위로 추출
이제 문장 단위로 끊어보자
문장 단위로 끊는 방법은 . 이나 ? 그리고 ! 가 나올 때 까지 단어를 모두 저장 해 준 뒤,
앞 세 기호가 나오면 문장으로 저장해주면 됨.
from google.cloud import speech
import io

def transcribe_with_sentence_timing(audio_file_path):
    # Initialize the Google Cloud client
    client = speech.SpeechClient()

    # Load the audio file
    with io.open(audio_file_path, "rb") as audio_file:
        content = audio_file.read()

    # Configure the audio and recognition settings
    audio = speech.RecognitionAudio(content=content)
    config = speech.RecognitionConfig(
        encoding=speech.RecognitionConfig.AudioEncoding.LINEAR16,
        sample_rate_hertz=48000,  # Ensure this matches your audio file
        language_code="en-US",
        enable_word_time_offsets=True,  # Enable word time offsets
        enable_automatic_punctuation=True  # Enable automatic punctuation
    )

    # Perform the transcription
    response = client.recognize(config=config, audio=audio)

    # Process the transcription result to identify sentence boundaries
    sentences = []
    current_sentence = []
    sentence_start_time = None

    for result in response.results:
        alternative = result.alternatives[0]
        for word_info in alternative.words:
            word = word_info.word
            start_time = word_info.start_time.total_seconds()
            end_time = word_info.end_time.total_seconds()

            if sentence_start_time is None:
                sentence_start_time = start_time

            current_sentence.append(word)

            if word.endswith(('.', '?', '!')):  # Sentence-ending punctuation
                sentence_text = ' '.join(current_sentence)
                sentences.append({
                    'sentence': sentence_text,
                    'start_time': sentence_start_time,
                    'end_time': end_time
                })
                current_sentence = []
                sentence_start_time = None

    # Print the sentences with their timing
    for sentence_data in sentences:
        sentence = sentence_data['sentence']
        start_time = sentence_data['start_time']
        end_time = sentence_data['end_time']
        print(f"Sentence: {sentence}")
        print(f"Start time: {start_time}s, End time: {end_time}s\n")

if __name__ == "__main__":
	audio_file_path = "audio_mono.wav"
	transcribe_with_sentence_timing(audio_file_path)
실행하면, 문장 단위로 잘 보이는 것을 볼 수 있다!

728x90
반응형
'SELF STUDY > Python' 카테고리의 다른 글
| [Python] VSCode 가상환경 설정 | 가상환경 생성 | 활성화 | python3 | Venv (0) | 2024.08.19 |
|---|---|
| [Python] FastAPI란? | FastAPI 사용해보기 (0) | 2024.08.15 |
| [Python] 유튜브 영상 전체 다운로드 | 오디오 파일만 다운로드 | yt_dlp |ffmpeg (1) | 2024.08.10 |