이번에는 key 추가 2단계!
1단계는 아래에서 확인 👇👇👇👇👇
https://codingstorywithme.tistory.com/44
[Android][Framework] Key 추가 1단계 | Kernel keycode 확인 | adb shell getevent 정보 | Keyevent 확인
#define EV_KEY 0x01오늘은 Android 기본 소스에 Key 를 하나 추가하는 순서에 대해 적어보려고 한다. 커널 쪽은.. 잘 모르지만.. 그 위 단계부터 해보려고한다..! 이전 포스팅에서 키 이벤트가 발생하는
codingstorywithme.tistory.com
볼륨 UP 키를 추가하기 2단계는 빠밤!
바로바로
2. Key layout 파일 생성 및 키코드 추가
이전 포스팅인 1단계에서 adb shell getevent 에 대한 정보를 알아보았다.
거기서 이번 2단계에서 필요한 중요한 정보가 있는데, 그 정보는 바로바로! 👇👇👇👇👇!!

추가하고 싶은 event의 event device path에 해당하는 name과
추가하고 싶은 event의 key code 이다.
이 두가지 정보를 잘 기억해보자.!
Android source 에서 /device/ 아래를 보면
( 이 부분은 소스마다, 모델 마다 다르기 떄문에 정의하기가 어렵다.. 각자가 찾아보는 것이 좋을 것 같다..)
구글 소스로 예를 들면 👇👇👇👇👇
https://android.googlesource.com/device/google/marlin/+/fa7f7382e8b39f7ca209824f97788ab25c44f6a3/
/ - device/google/marlin - Git at Google
android.googlesource.com
이렇게 경로를 따라서 들어가다 보면, kl 파일들을 확인 할 수 있을 것이다.
kl 이란 ?
keylayout 파일로 Key 에 대한 Kernel keycode를 정의하는 파일이다. Kernel keycode를 정의함으로써 Android 전반에서 해당 key event를 받고 전달 할 수 있게 한다.
해당 파일에 대한 정보는 구글 개발자 사이트에 자세히 나와있다.
https://source.android.com/devices/input/key-layout-files?hl=ko
키 레이아웃 파일 | Android 오픈소스 프로젝트 | Android Open Source Project
키 레이아웃 파일 키 레이아웃 파일(.kl 파일)은 Linux 키 코드와 축 코드를 Android 키 코드 및 축 코드에 매핑하고 관련 정책 플래그를 지정합니다. 기기별 키 레이아웃 파일은 다음과 같습니다. 음
source.android.com
생성하고 싶은 Key를 추가할 kl 파일 찾는 방법!
| 1. 추가하고 싶은 key event의 event file path name확인 ex) 추가하고 싶은 key event가 volume up일때, name은 gpio-keys 2. event file path name의 kl 파일이 있는지 확인 ex) gpio-keys.kl 파일이 있는지 확인 |
이렇게 kl 파일을 찾을 수 있다.
즉 우리가 추가하고 싶은 key event의 event file path name는 "gpio-keys" 였고, 이에해당하는 kl 파일은 gpio-keys.kl 파일로 생각하면 된다.
여기서 추가할 key event의 event file path name에 해당하는 kl 파일이 이미 존재하는 경우와 아닌 경우로 나누어 생각할 필요가 있다.
-1. kl 파일이 이미 존재하는 경우
kl 파일을 열고, 아래에 추가해주면 된다.
gpio-keys.kl - device/google/marlin - Git at Google
# Copyright (c) 2013-2015, The Linux Foundation. All rights reserved. # Redistribution and use in source and binary forms, with or without # modification, are permitted provided that the following conditions are # * Redistributions of source code must reta
android.googlesource.com
추가 할 때, 형식은
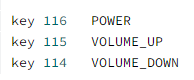
"key" / kernel keycode / key name
여기서 key name의 경우, 이후 Android 에서 key를 다루는데 중요하게 사용 될 예정으로 주의깊게 살펴보고 이름도 잘 짓는게 좋다.
-2. 존재하는 kl파일이 없는 경우
원하는 경로에 kl 파일을 생성하고, 그 안에 key code를 추가하면 된다.
추가 후 해당 kl파일의 경로를 .mk 파일에 추가해주면 된다.
(이때 mk 파일의 경로도 모델, 버전 등에 따라 다르게 되니 찾아보시면,,,)
안드로이드의 경우
device-common.mk - device/google/marlin - Git at Google
# Copyright (C) 2016 The Android Open-Source Project # Licensed under the Apache License, Version 2.0 (the "License"); # you may not use this file except in compliance with the License. # You may obtain a copy of the License at # http://www.apache.org/lice
android.googlesource.com
이 소스코드를 확인하면 된다.

이런식으로 PRODUCT_COPY_FILES 에 추가시켜주면 된다.
이제 다음 포스팅에서는 frameworks 단계에서 전체적인 키 추가 방법에 대해 정리해봐야겠다.!
끘