728x90
반응형
이번 시간에는 넷플릭스에 들어가는 N로고를 추가하는 방법에 대해 알아보는 시간~
나는 강사님이 만들어주신 B로고를 그대로 사용했는데, Y로 바꾸고 싶다+_+
이미지 파일 패키지에 추가하는 방법
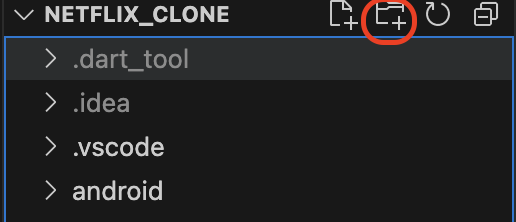
1. root폴더 아래에 images폴더 생성

버튼 누르고 images 폴더 생성 (원하는 폴더명으로 하면 될 듯)
2. 생성한 폴더 (images)에 추가하고자 하는 이미지 파일 저장
3. pubspec.yaml 파일 수정
assets에 있는 주석을 지우고, 원하는 파일의 경로를 추가해주면 된다.
ex) 수정 전
  # To add assets to your application, add an assets section, like this:
  # assets:
  #   - images/a_dot_burr.jpeg
  #   - images/a_dot_ham.jpeg
수정 후
  # To add assets to your application, add an assets section, like this:
  assets:
     - images/bbongflix_logo.png
이렇게 하면 파일 추가 완료!
꼭 파일을 추가 할 때는 pubspec.yaml 파일을 수정해줘야함
이미지 파일 화면에 추가하기
Image.asset을 이용해서 추가해주면 된다.
예시 :
Image.asset(
    'images/bbongflix_logo.png',
    fit: BoxFit.contain,
    height: 25
  ),
전체 소스
넷플릭스 상단바를 보면 맨 앞에 로고가 있는데, 해당 로고를 구현한 것.
상단바 구현과 같이 진행했다.
home_screen.dart
// StatefulWidge : to get movie information from backend
class HomeScreen extends StatefulWidget {
  const HomeScreen({super.key});

  @override
  _HomeScreenState createState() => _HomeScreenState();

}

class _HomeScreenState extends State<HomeScreen> {
  @override
  void initState() {
    super.initState();
  }

  @override
  Widget build(BuildContext context) {
    return const TopBar();
  }
}

// Top bar
class TopBar extends StatelessWidget {
  const TopBar({super.key});

  @override
  Widget build(BuildContext context) {
    return Container(
      padding: const EdgeInsets.fromLTRB(20, 7, 20, 7),
      child: Row(
        mainAxisAlignment: MainAxisAlignment.spaceBetween,
        children: <Widget>[
        Image.asset(
            'images/bbongflix_logo.png',
            fit: BoxFit.contain,
            height: 25
          ),
          Container(
            padding: const EdgeInsets.only(right: 1),
            child: const Text(
              'TV Program',
              style: TextStyle(fontSize: 14),
            )
          ),
          Container(
            padding: const EdgeInsets.only(right: 1),
            child: const Text(
              'Movie',
              style: TextStyle(fontSize: 14),
            )
          ),
          Container(
            padding: const EdgeInsets.only(right: 1),
            child: const Text(
              'Liked Content',
              style: TextStyle(fontSize: 14),
            ),
          )
      ])
    );
  }
}
main.dart
기존에 container로 구현했던 home 화면을 위에서 구현해준 펑션으로 변경해주면 된다!
children: <Widget>[
    // put screent for displaying to children.
    HomeScreen(),
    Container(
      child: const Center(
        child: Text('search'),
        ...
이 소스를 실행시켜보면!

따란~
이렇게 로고가 제대로 잘 나오는 것을 확인 할 수 있다.
Github : https://github.com/leehy0321/NetflixClone/commit/5985a0189cd4ded4a6d47b8f7ab9052139a262c4
728x90
반응형
'SELF STUDY > Flutter' 카테고리의 다른 글
| [Flutter] 화면 간 이동 구현 | Navigator (0) | 2024.04.25 |
|---|---|
| [Flutter] CrossAxisAlignment 란? (0) | 2024.04.25 |
| [Flutter] 넷플릭스 클론 코딩 #4 | 데이터 생성 | 더미데이터 생성 (0) | 2024.04.25 |
| [Flutter] 넷플릭스 클론 코딩 #2 | 하단 네비게이션 바 생성 (0) | 2024.04.23 |
| [Flutter] 넷플릭스 클론 코딩 #1 | 플러터 개발 환경 세팅 | fix 'bottom overflowed by 19 pixels' error (0) | 2024.04.22 |