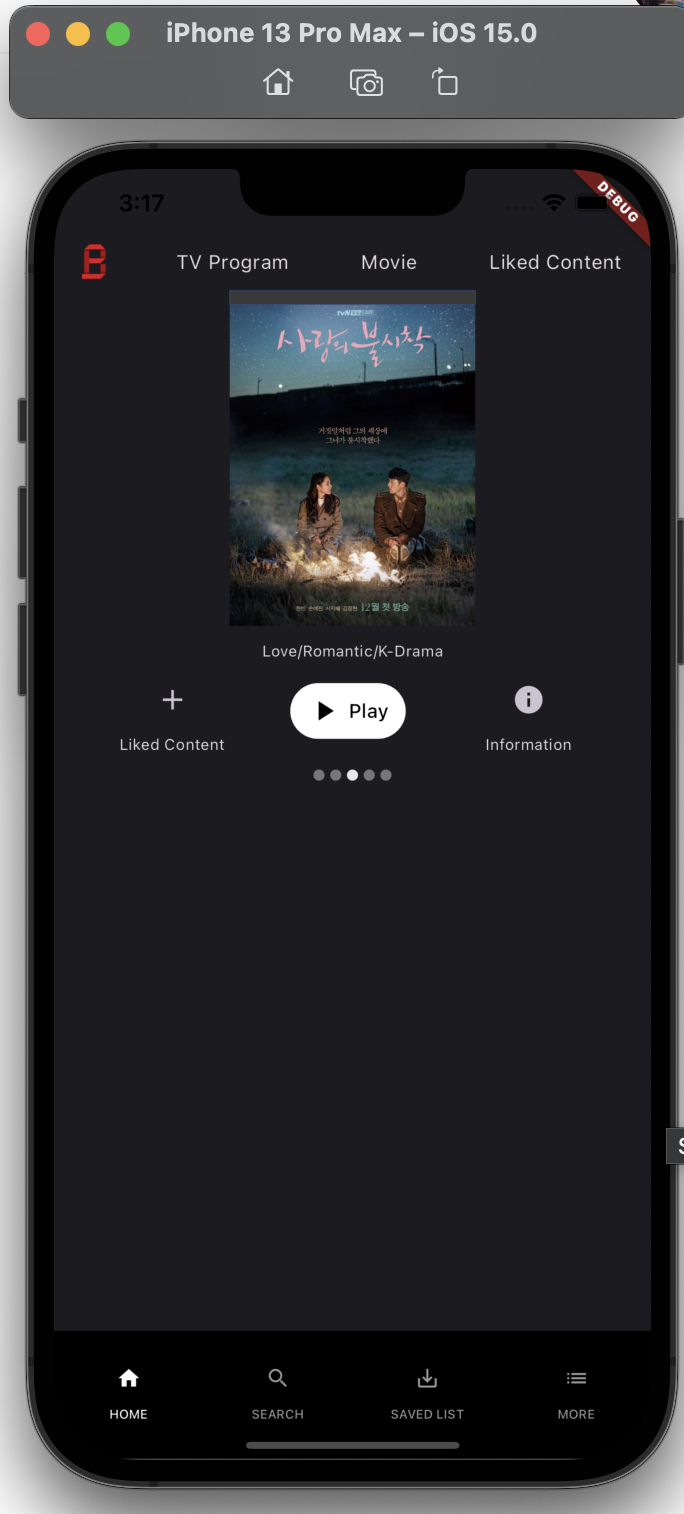
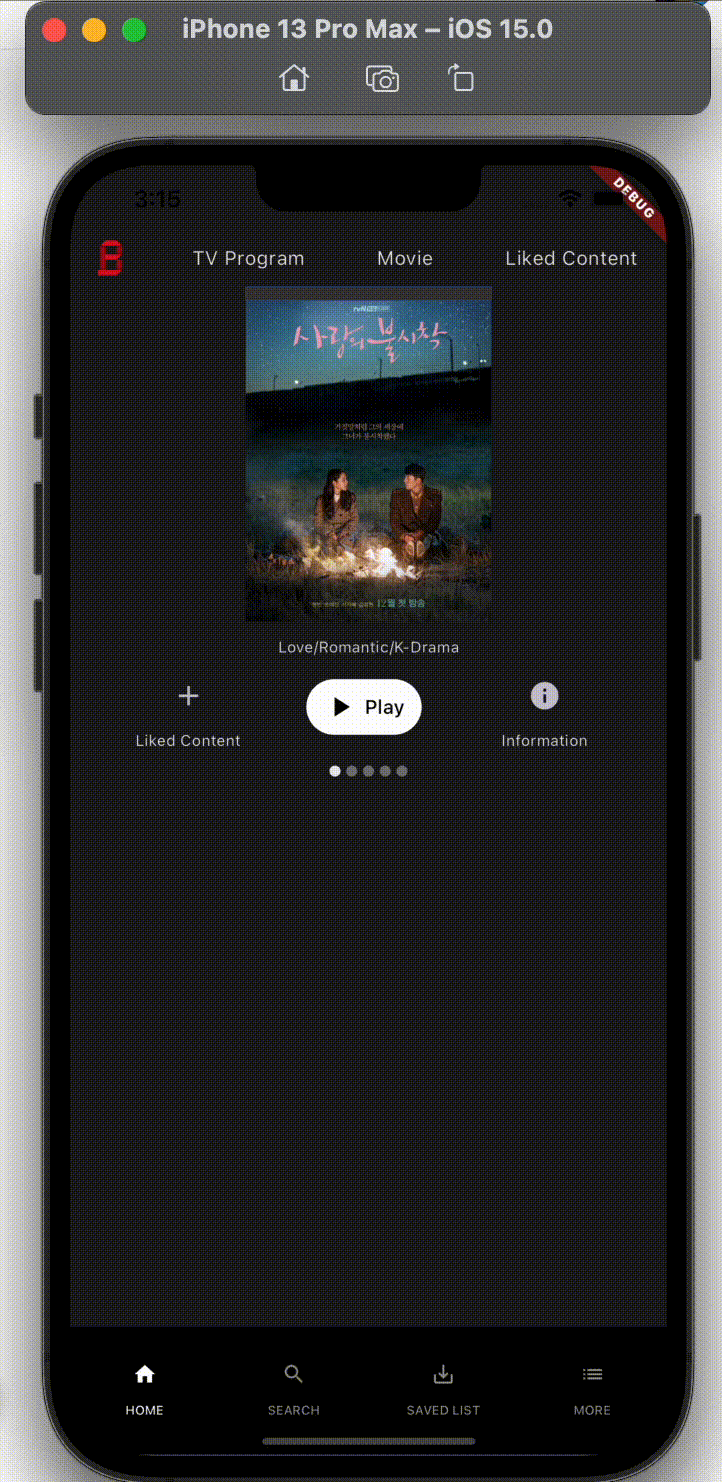
넷플릭스에서 메인화면에 포스터가 크게 보이고, 옆으로 넘기면 다른 포스터가 보이는 화면을 구현해보았다-
Carousel Slider Dependency 추가
Carousel Slider를 사용하기 위해서는 디펜던시를 추가해줘야한다.
pubspec.yaml
dependencies:
  flutter:
    sdk: flutter

  carousel_slider:
  ...
저장하면 자동으로 필요한 파일을 다운로드 받고, 추가가 된다.
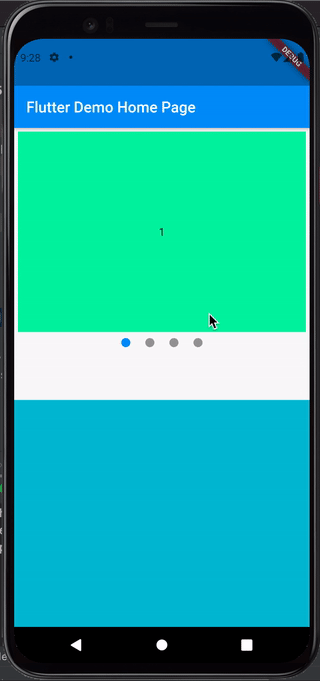
Carousel Slider 추가
현재 포스터가 무엇인지 기억하기 위해 index와 keyword 는 전역변수로 관리를 해주기로.!
CarouselSlider(
    items: images,
    options: CarouselOptions(onPageChanged: (index, reason) {
      setState(() {
        _currentPage = index;
        _currentKeyword = keywords[_currentPage];
      });
    }),
  ),
여기서 Indicator와 함께 써주었는데, indicator는 아래와 같이 목록 중 현재 위치를 알려주는 것을 의미한다.
출처 : https://stackoverflow.com/questions/55373151/pager-indicator-flutter
...
// Indicator
Container(
    child: Row(
        mainAxisAlignment: MainAxisAlignment.center,
        children: makeIndicator(likes, _currentPage),
))
...


// Indicator
List<Widget> makeIndicator(List list, int currentPage) {
  List<Widget> results = [];
  for (var i = 0; i < list.length; i++) {
    results.add(Container(
      width: 8,
      height: 8,
      margin: const EdgeInsets.symmetric(vertical: 10.0, horizontal: 2.0),
      decoration: BoxDecoration(
          shape: BoxShape.circle,
          color: currentPage == i
              ? const Color.fromRGBO(255, 255, 255, 0.9)
              : const Color.fromRGBO(255, 255, 255, 0.4)),
    ));
  }

  return results;
}
이렇게 구현해주었다.
현재 페이지와 일치 할 경우, 투명도 조절을 통해 더 진하게 보이도록!
전체 코드를 보면
carousel_slider.dart
각 영화에는 포스터 / 정보 (키워드) / 재생 (버튼만 구현 - 동작 구현 X) 버튼들이 있는데, 버튼에 대한 동작은 다음 강의에서 진행 할 예정!
그래서 onPressed: {} 이렇게 비워두었다.
import 'package:carousel_slider/carousel_slider.dart';
import 'package:flutter/material.dart';
import 'package:netflix_clone/model/model_movie.dart';

// StatefulWidget : not only showing a image, but also like button and detail information.
class CarouseImage extends StatefulWidget {
  final List<Movie> movies;
  const CarouseImage({super.key, required this.movies});

  @override
  _CarouseImageState createState() => _CarouseImageState();
}

// 데이터베이스에서 데이터를 읽어 각각 list로 저장해준다.
class _CarouseImageState extends State<CarouseImage> {
  late List<Movie> movies;
  late List<Widget> images;
  late List<String> keywords;
  late List<bool> likes;

  int _currentPage = 0; // current content
  String _currentKeyword = "";

  @override
  void initState() {
    super.initState();

    movies = widget.movies;
    images = movies.map((m) => Image.asset('./images/${m.poster}')).toList();
    keywords = movies.map((m) => m.keyword).toList();
    likes = movies.map((m) => m.like).toList();

    _currentKeyword = keywords[0];
  }

  @override
  Widget build(BuildContext context) {
    return Container(
        child: Column(children: <Widget>[
        Container(
          padding: const EdgeInsets.all(20),
        ),
        CarouselSlider(
          items: images,
          options: CarouselOptions(onPageChanged: (index, reason) {
            setState(() {
              _currentPage = index;
              _currentKeyword = keywords[_currentPage];
            });
          }),
        ),
        Container(
            padding: const EdgeInsets.fromLTRB(0, 10, 0, 3),
            child: Text(_currentKeyword, style: const TextStyle(fontSize: 11))),

        // menu bar
        Container(
            child: Row(
                mainAxisAlignment: MainAxisAlignment.spaceEvenly,
                children: <Widget>[
              // Like button
              Container(
                  child: Column(children: <Widget>[
                likes[_currentPage]
                    ? IconButton(icon: const Icon(Icons.check), onPressed: () {})
                    : IconButton(icon: const Icon(Icons.add), onPressed: () {}),
                const Text('Liked Content', style: TextStyle(fontSize: 11))
              ])),

              // Play button
              Container(
                  padding: const EdgeInsets.only(right: 10),
                  child: TextButton(
                    style: TextButton.styleFrom(backgroundColor: Colors.white),
                    onPressed: () {},
                    child: const Row(
                      children: <Widget>[
                        Icon(Icons.play_arrow, color: Colors.black),
                        Padding(padding: EdgeInsets.all(3)),
                        Text(
                          'Play',
                          style: TextStyle(color: Colors.black),
                        ),
                      ],
                    ),
                  )),

              // Information button
              Container(
                  padding: const EdgeInsets.only(right: 10),
                  child: Column(children: <Widget>[
                    IconButton(
                      icon: const Icon(Icons.info),
                      onPressed: () {},
                    ),
                    const Text('Information', style: TextStyle(fontSize: 11))
                  ])),
            ])),

        // Indicator
        Container(
            child: Row(
          mainAxisAlignment: MainAxisAlignment.center,
          children: makeIndicator(likes, _currentPage),
        ))
     ]));
  }
}

// Indicator
List<Widget> makeIndicator(List list, int currentPage) {
  List<Widget> results = [];
  for (var i = 0; i < list.length; i++) {
    results.add(Container(
      width: 8,
      height: 8,
      margin: const EdgeInsets.symmetric(vertical: 10.0, horizontal: 2.0),
      decoration: BoxDecoration(
          shape: BoxShape.circle,
          color: currentPage == i
              ? const Color.fromRGBO(255, 255, 255, 0.9)
              : const Color.fromRGBO(255, 255, 255, 0.4)),
    ));
  }

  return results;
}
그리고 이제 이 기능을 홈 스크린에서 불러와주면 된다.
겹쳐서 위로 보이게 하기
넷플릭스 메인 화면을 보면,
아래와 같이 포스터 위에 TopBar(TV프로그램/영화/내가찜한콘텐츠)가 겹쳐서 보인다.

출처 : https://brunch.co.kr/@rainofflowers/127
이러한 UI는 Stack을 이용하여 구현하면 된다.
https://api.flutter.dev/flutter/widgets/Stack-class.html
Stack class - widgets library - Dart API
A widget that positions its children relative to the edges of its box. This class is useful if you want to overlap several children in a simple way, for example having some text and an image, overlaid with a gradient and a button attached to the bottom. Ea
api.flutter.dev
home_screen.dart
테스트를 위해 더미데이터를 5개로 늘렸다.
class _HomeScreenState extends State<HomeScreen> {
  // movie dummy data for testing
  List<Movie> movies = [
    Movie.fromMap({
      'title': 'Crash Landing On You',
      'keyworkd': 'Love/Romantic/K-Drama',
      'poster': 'test_movie_1.png',
      'like': false
    }),
    Movie.fromMap({
      'title': 'Crash Landing On You',
      'keyworkd': 'Love/Romantic/K-Drama',
      'poster': 'test_movie_1.png',
      'like': false
    }),
    Movie.fromMap({
      'title': 'Crash Landing On You',
      'keyworkd': 'Love/Romantic/K-Drama',
      'poster': 'test_movie_1.png',
      'like': false
    }),
    Movie.fromMap({
      'title': 'Crash Landing On You',
      'keyworkd': 'Love/Romantic/K-Drama',
      'poster': 'test_movie_1.png',
      'like': false
    }),
    Movie.fromMap({
      'title': 'Crash Landing On You',
      'keyworkd': 'Love/Romantic/K-Drama',
      'poster': 'test_movie_1.png',
      'like': false
    }),
  ];

  @override
  void initState() {
    super.initState();
  }

  @override
  Widget build(BuildContext context) {
    return ListView(children: <Widget>[
      Stack(children: <Widget>[CarouseImage(movies: movies), const TopBar()])
    ]);
  }
}
이렇게 구현한 것을 동작시키면~